

Video Conference
Table of Contents
3.1 Mute / Unmute
3.2 Start / Stop camera
3.3 Share your screen
3.4 Open / Close chat
3.5 Raise your hand
3.6 Toggle tile view
3.7 Invite people
3.8 Leave
3.2 Start / Stop camera
3.3 Share your screen
3.4 Open / Close chat
3.5 Raise your hand
3.6 Toggle tile view
3.7 Invite people
3.8 Leave
1. Overview
1.1 Introduction
As part of a complete Unified Communications and Collaboration offering, InfinityOne supports an integrated video conferencing and screen sharing capability. If your InfinityOne system administrator has enabled it, you will be able to create and join video conferences with a click of a button inside the room of your choice - either a Channel, a Direct Message, a Private Group, or an N-Way conversation. InfinityOne will create a unique video conference for that room. That room name can then be shared with outside (i.e. non-InfinityOne) users to allow both internal and external attendees to participate in the video conference.
1.2 Basic Operation
Any user that is allowed to have video access through the InfinityOne system can initiate or join video conferences from within the InfinityOne environment. A user on the InfinityOne system can initiate a video conference (and subsequently a screen sharing session) via a click of the Camera icon. The video conference created is specific to the particular room from which the conference request was initiated. Other members of that room will receive notification of the initiation of the video conference based on the notification settings they have already configured for that room. (See InfinityOne - Notifications.)
Once the video conference is started by a room member, other members of that room can simply click the Camera icon while in that room and join.
Anyone participating in a video conference initiated within the InfinityOne system can easily copy the video conference meeting url and share with others, including non room members, and even non-InfinityOne users both within the organization and outside of it, allowing them to join.
1.3 Device Settings
Camera and Microphone Settings
The settings for the web camera and the microphone used while engaged in a video conference session are controlled from within the video conference screen, independent of the device settings used for the integrated softphone.
Browser/Desktop Interface
Camera and Microphone settings are configured specifically for the video conference once the video window opens and the conference is started. Devices connected to the computer that are supported in the Chrome browser will be presented and can be selected in the video conference settings controls.
Note that E-MetroTel support for the overall InfinityOne Web Browser Interface is limited to Chrome. Other browser applications such as Opera and Edge may work for many of the InfinityOne capabilities but video cannot be used on the Edge browser.
Mobile Interface
Mobile devices have the ability to select front and rear cameras, as well as front (handset mode) and rear (handsfree mode) audio devices during a video session.
2. Starting a Video Conference Call
You may initiate a video conference on whichever InfinityOne user interface that you are using. To start a video conference, you must first select the channel (public, private, n-way or direct message) appropriate for the conference using the normal procedures for your current user interface. The actual initiation of the video conference differs slightly depending on the current user interface to which you are connected.
-
After selecting the desired channel, if you want to initiate a video conference, click on the Video icon (
 ).
). -
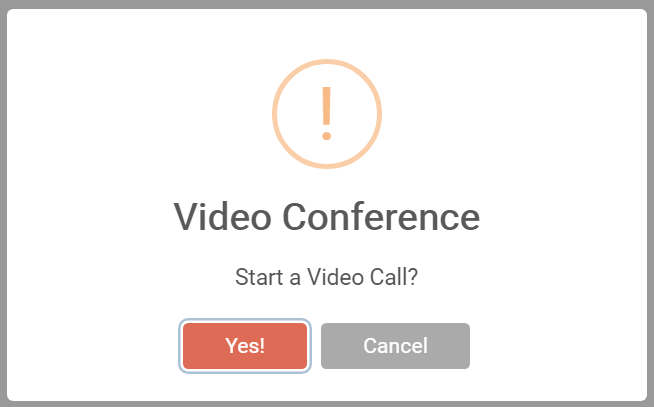
You will be presented with a Start a Video Call dialog.

- Click Yes.
- On the Browser interface, a new window will open. You may be asked to re-validate your InfinityOne account credentials using the standard login dialog interface.
-
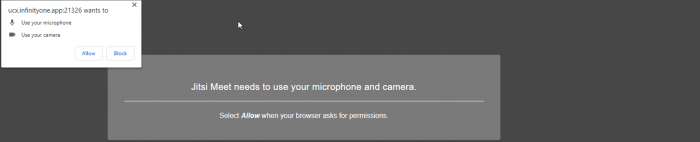
The first time you connect you will likely be asked to provide permission for the browser to access your microphone and your video camera. Select Allow.
-
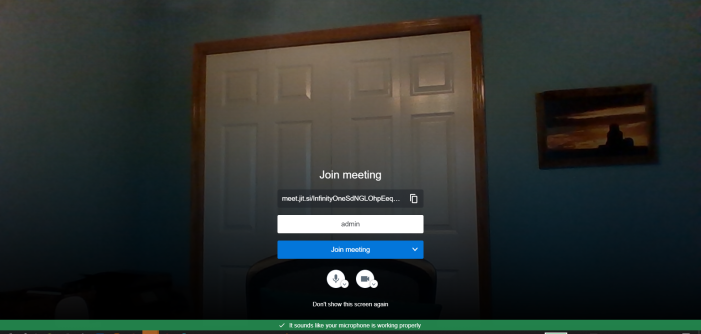
Once you have confirmed the use of your microphone and camera, a "courtesy" or pre-meeting screen is displayed. (This feature can be turned off in Settings.) This screen allows you to adjust various settings prior to connecting to the video conference session including:
- Modify the name displayed to other conference participants for the duration of the session (using the white text box)
- Confirm or select your desired audio for this session (using the microphone icon drop-box)
- Confirm or select your video devices for this session (using the camera icon drop-box)
- Mute/unmute your audio prior to joing the session (clicking the microphone icon)
- Start/stop your video prior to joining the session (clicking the camera icon)
- Adjust the camera position (if possible on your computer)
The InfinityOne interface also provides a confirmation message to indicate if it can detect sound through the selected microphone input.
-
Click on the blue Join meeting button to connect to the meeting with the microphone and video settings you have selected. If you are connecting to the video conference using a separate phone connection for audio, click the drop-down box on the blue Join meeting button and select Join without audio.


3. Basic Video Conference Tools
Once you have connected to a video session, several tools are presented depending on your interface.

3.1 Mute / Unmute 
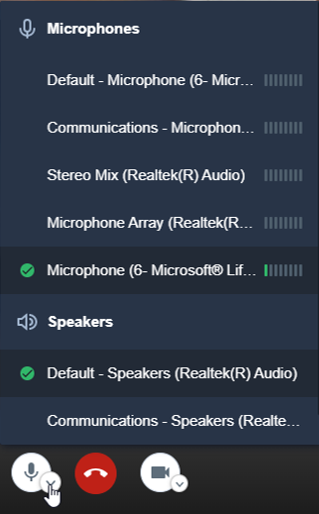
Click the Mute / Unmute button to mute or un-mute your microphone.
Click the small drop-down arrow to choose the audio devices (microphone and speakers) input you wish to use. You may change audio devices during a conference.
3.2 Start / Stop Camera 
Click the Start / Stop camera button to start or pause video transmission for your camera of choice.
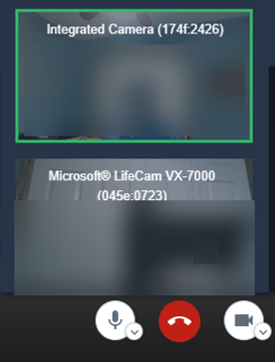
Click the small drop-down arrow to choose which camera you wish to use. You may change cameras during a conference.
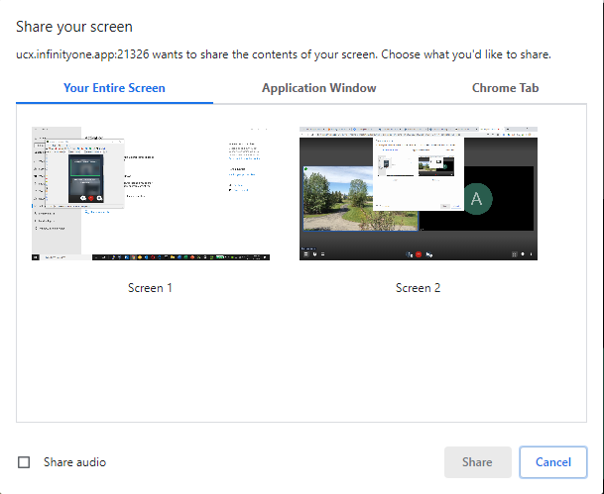
3.3 Sharing your Screen 
Click the Share your screen button to allow others to see the contents of the screen. You can share:
- Your entire screen (if you have multiple monitors you can choose which one), regardless of which window is visible.
- Individual Application windows
- Individual Chrome tabs
3.4 Open / Close Chat 
Click the Open / Close chat button to open the messaging dialog box. Opening this and beginning to type immediately will send a chat message to all users. Initiating the chat from the view window of a single user will send a private message visible only to that user.
When reviewing the list of messages, you will be able to see to whom each message was sent or received. If no specific user is mentioned then the message was a general message. If the message was sent to you as a private message there will be an arrow icon indicating that you can respond directly to the other user.
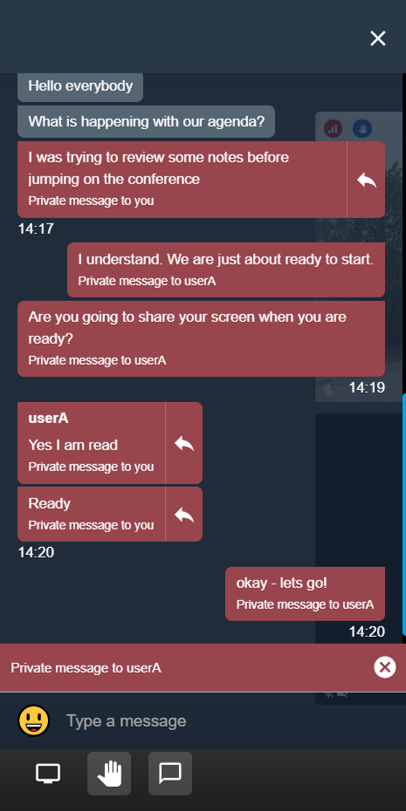
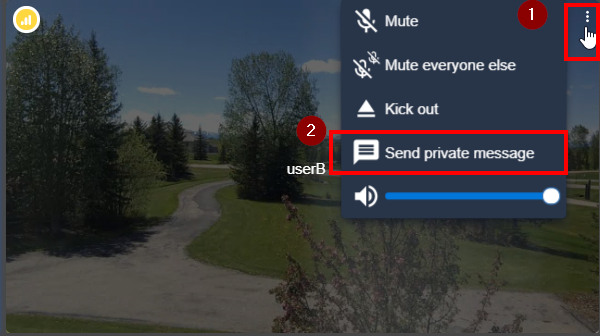
To begin a private chat with another user, first click on the three dots on the top-right corner of the users' view window in gallery display mode or the lower-left corner of the collapsed view window in a single user display mode then select Send private message.

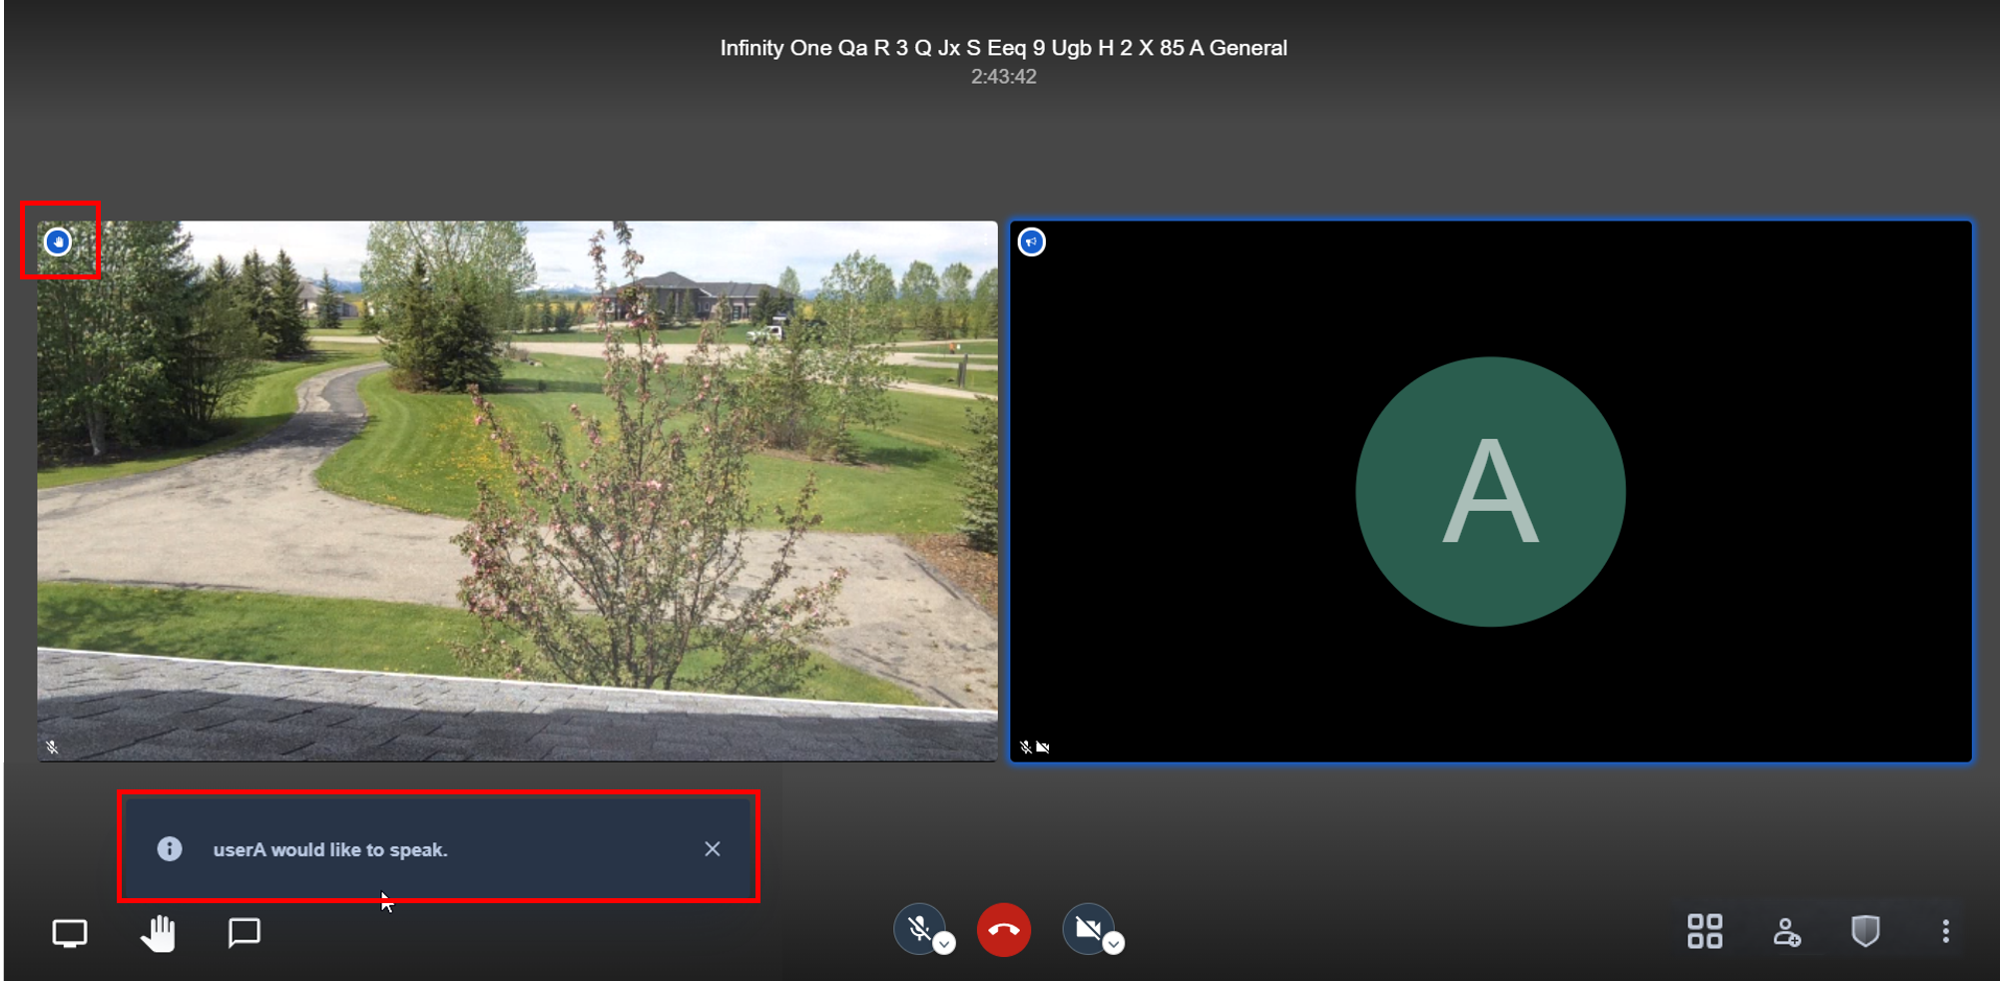
3.5 Raise your hand 
Click the Raise/Lower your hand button to indicate that you want an opportunity to speak without interrupting the current flow of conversation. When you click, a message will briefly flash in the message area for all other users indicating you wish to speak, and a blue colored Hand  icon will be shown within your view window on other user's screens.
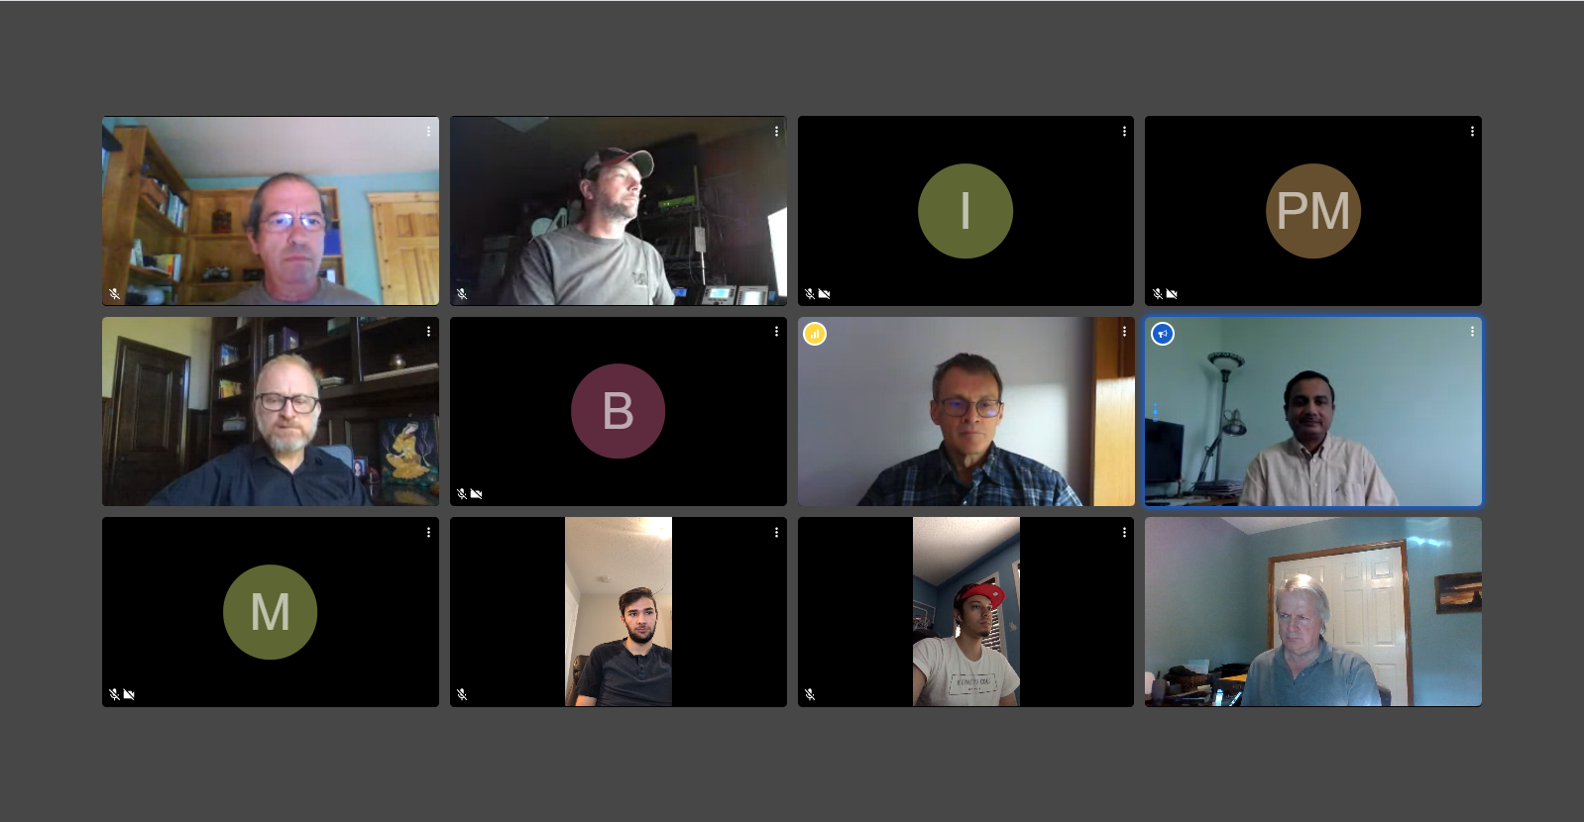
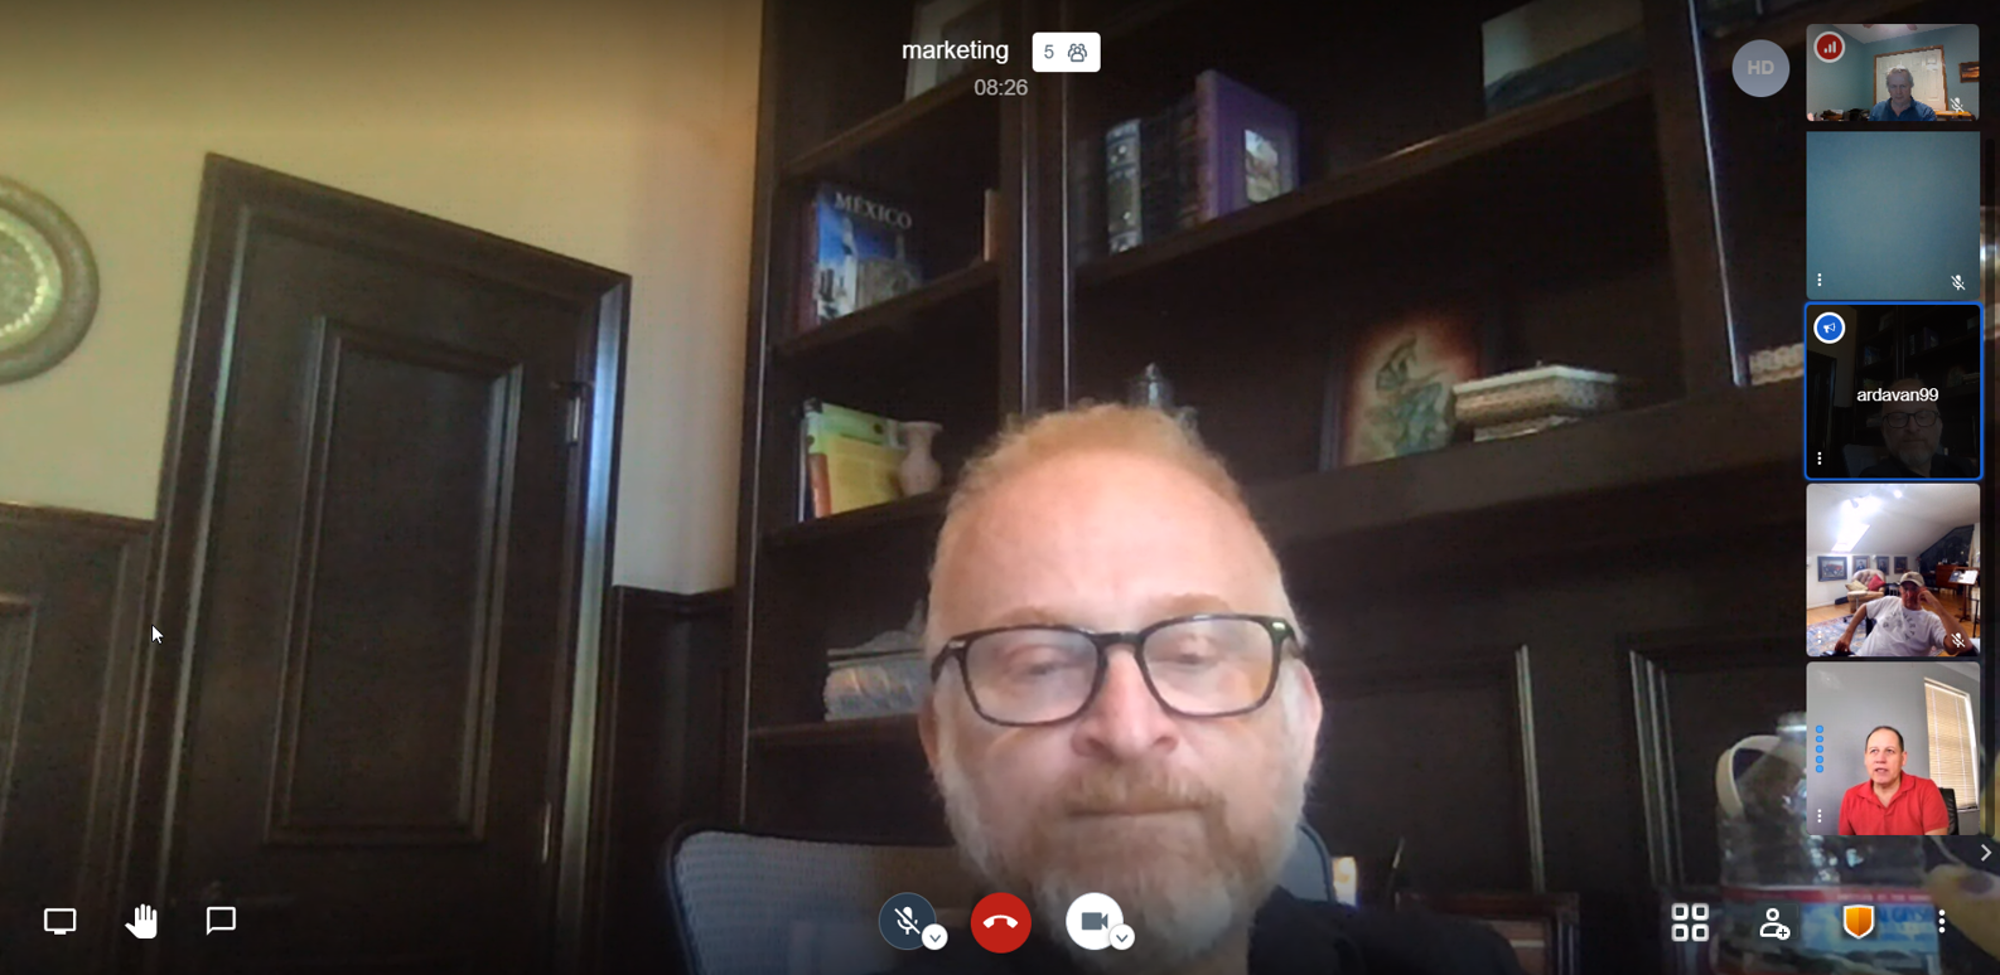
3.6 Toggle tile view 
Click the Toggle tile view button to toggle between showing the gallery view of all participant view windows using the same dimensions, or the individual view, where either the current speaker view is sized to fit the browser window or a user that you have clicked on from one of the user view windows is maximized.
If there is insufficient space on your screen to display all of the participant user views, then you may scroll to see the remainder.
Gallery View
Individual View
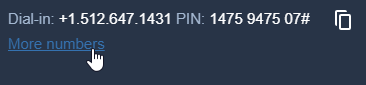
3.7 Invite People 
Click the Invite People button to display a pop-up window with the links and dial-in info for this video conference:
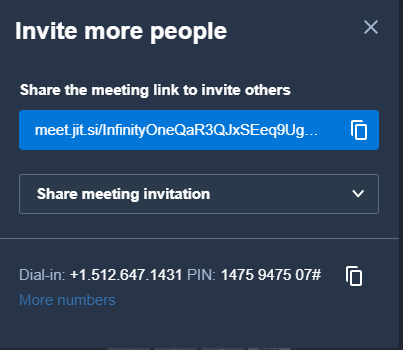
From this pop-up window, you can:
-
Quickly copy just the meeting link to be able to send it to others in whatever method you wish


-
Auto-generate a formal meeting invitation
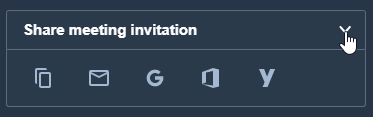
-
Copy just the phone number,

-
See a list of additional phone numbers for different geographic locations.
3.8 Leave 
Use the Leave button to leave the conference. If you are the last participant, this will end the video conference.
4. More Actions 
Click the More actions button to access additional meeting controls and settings.

A few of the key items accessed through this menu are described below.
4.1 Manage Call Quality
Useful to manage bandwidth consumption at remote sites. The lowest bandwidth turns video feeds off in both directions while maintaining audio communication.

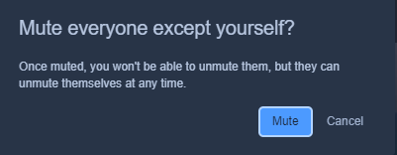
4.2 Mute everyone
Useful to make sure that background distractions are kept to a minimum.
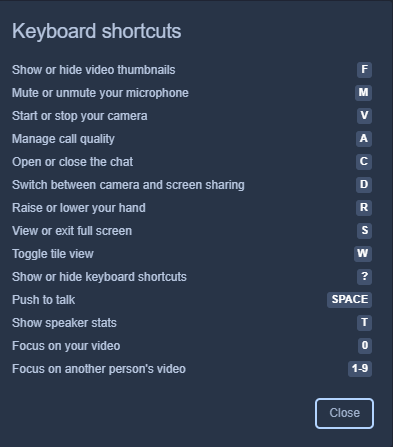
4.3 View Shortcuts
5. Security Options 
Security options are accessed from the More actions menu.
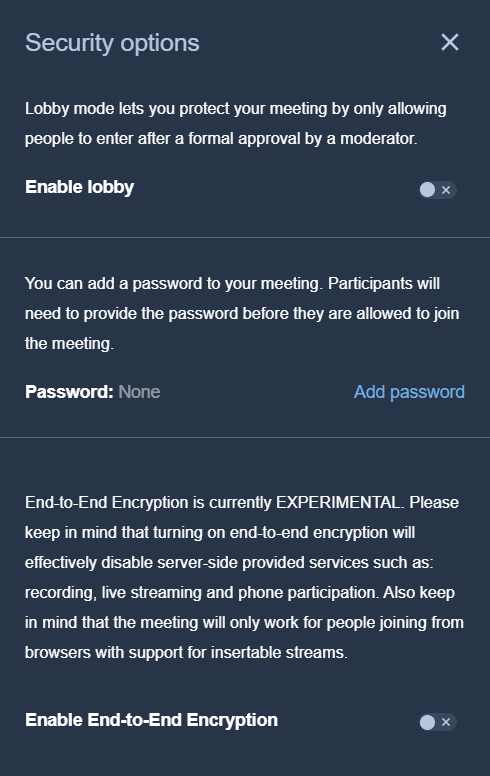
5.1 Lobby Mode
Lobby Mode provides a mechanism for the meeting initiator to pre-screen additional users before they enter the video conference.
By setting this to ON, new users will be presented to the current participants in a Knocking Participants List.
Any of the current participants can decide to Allow or Reject the individual(s) identified in the list.
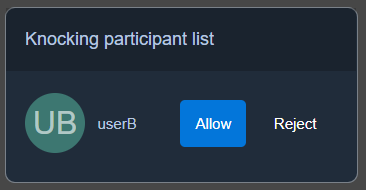
Users in the Knocking Particiapnts List will see a notification "You'll be able to join the meeting as soon as someone accepts your request".
5.2 Password
You can create a one-time password by clicking on Security options.
- Click on Add password.
- Then enter a text string in the Password field.
- Click Add or you may Cancel.
- Subsequently you may click Remove to remove the password.
After creating a password, all subsequent entrants to the meeting will be requested to enter the password before they can access the conference; there is no need for existing participants to enter a password.
Note that the password only persists for the duration of the current meeting and must be set each time a new video conference is initiated.
If a password has been set, the Security Options icon will display Green.
If a password has been set, the Security Options icon will display Green.
5.3 Encryption
You may optionally use the experimental End-to-End Encryption capability, although this may impact the ability for some users to participate in the conference.
To enter a key, click Set key and enter a string in the Key field, then click Set.
Once the key is set, a Green padlock icon will be displayed near the top right corner of the window.
To remove a key, click Set key and delete the string in the Key field, then click Set.
6. Settings 
Settings is access from the More actions menu.
6.1 Settings - Devices
Under Devices, you can select the Camera, Microphone and Audio output devices for your video conference session.

6.2 Settings - More
Under More settings, additional options for the moderator can be configured here.
