

SIP Settings
Before you start creating extensions for SIP phones or SIP trunks, you should review options configured for SIP devices.
To configure common options used for all SIP devices (phones and trunks), perform the following steps:
- Open the UCx Web-based Configuration Utility
- From the PBX tab, select PBX Configuration
- From the left side column, select SIP Settings
- Review the configured defaults
- If you made any changes in the settings for SIP phones, press the Submit Changes button to save the configuration
You should review and change the default values for some of the options as required:
NAT Settings
Update the NAT specific configuration options to match your network configuration.

| Setting | Description |
|---|---|
| NAT | Default is yes. |
| IP Configuration |
Default is Static IP. If Public IP is selected, the other fields are not applicable. Use Dynamic IP only if the following conditions are met:
|
|
STATIC IP - External IP
|
Enter the external Static IP address or FQDN as seen on the WAN side of the router. |
| DYNAMIC IP - Dynamic Host, Refresh Rate | Enter the external FQDN as seen on the WAN side of the router, and how often to refresh the dynamic host name in seconds. |
|
Local Networks
|
Enter IP settings of the local network in the form of IP / Mask. For example: 192.168.1.0 / 255.255.255.0. Blank lines will be removed when you submit. |
Audio Codecs

Video Codecs

Media & RTP Settings

Notification & MWI

Registration Settings

Jitter Buffer Settings

Advanced General Settings
If you want to change the default port number (5060) that is used by the UCx system for communication with SIP phones (for example for security reasons), enter the desired port number in the Bind Port field.
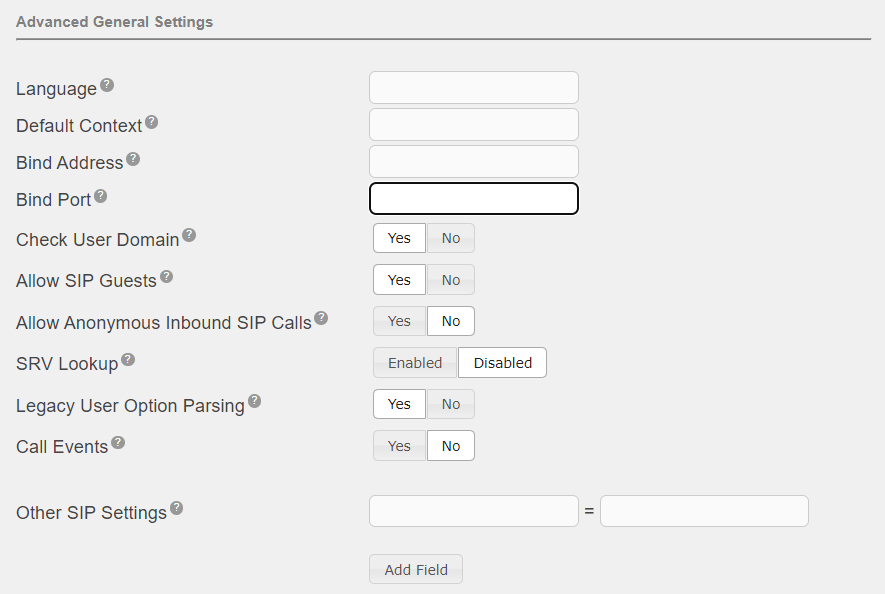
Other SIP Settings:
By default, the UCX sends SIP media (RTP) packets associated with SIP trunks with a special marking in the IP packet that routers can use to treat them with a higher priority as they traverse the internet. This prioritization marking is commonly referred to as DSCP (Diff Serv Code Point) tagging. By default, the UCX sends the SIP media packets with the industry standard DSCP value of EF (Expedited Forwarding). Some Internet Service Providers do not support the use of the EF value for DSCP and may actually treat it as lowest priority, which will cause intermittment packet loss and impact voice quality. In these circumstances, use the Other SIP Settings to change the DSCP for the SIP trunk media packets.
The value of the first field must be entered as "tos_audio" while the second field will be the new DSCP value to be used instead of the default.

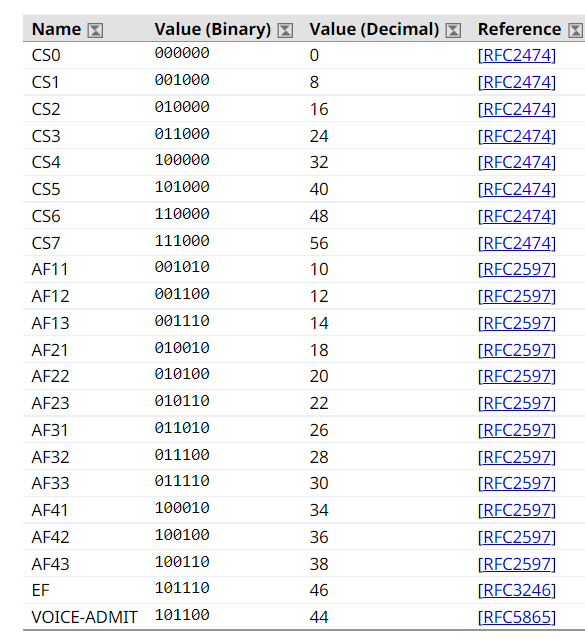
You may use any of the recognized DSCP Names (i.e. EF, CS0, etc) defined in RFC4594 in the value field:
Self Assessment Quiz
- Do you know what happens if you click on the Auto Configure button under NAT Settings?
- Do you know when to enable Jitter Buffer?
- What is the default port number for SIP devices?
- Do you understand the security risks of setting Allow Anonymous Inbound SIP Calls to Yes?