

Inbound Routes
In order to send incoming calls to the appropriate destination (to an extension, a ring group, IVR or a queue), you must configure one or more inbound routes.
You should maintain one inbound route with the DID Number and Caller ID Number fields left blank - this route will be used for all incoming calls from all trunks that do not match other inbound routes.
E-MetroTel recommends that you create one Inbound Route for the Main DID number. You will also need to create additional routes for any DIDs that require their own special destinations or treaments.
For each trunk or trunk type, you can create a corresponding inbound route to handle calls from that trunk or trunk type appropriately.
To add an inbound route, perform the following steps:
- Open the UCX Web-based Configuration Utility
- From the PBX tab, select PBX Configuration
- From the left side column, select Inbound Routes
- On the Add Incoming Route page, enter a name for the route in the Description field
- If you are creating a generic route, leave the DID Number (and the Caller ID Number) fields empty. For trunk or trunk type specific routes, enter the corresponding number(s) in the DID Number fields.
- Select a destination for the route in the Set Destination section of the page
- Press the Submit button to save the inbound route


Anchoring SIP calls on the UCX prior to Call Forward
In some scenarios, incoming calls on SIP trunks will be immediately forwarded back out to the PSTN or other location on another SIP connection. When this happens, there is a high likelihood that the forwarded call will experience one-way or no-way speech path. In order to reduce the chance that this occurs, the call should be "anchored" to the UCX upon arrive and prior to the forwarding action. This can be accomplished in several ways, including play a short greeting or even silence to the user prior to connecting to the destination identified in the Set Destination. However, E-MetroTel recommends the following:
- Set the Detect Faxes setting in the Inbound Route to Yes.
- Set the Fax Detection type to SIP
- Set the Fax Detection time to the smallest interval (i.e 2)
-
Set the Fax Destination to be the same as the actual destaintion for the inbound route (at the bottom of the page)
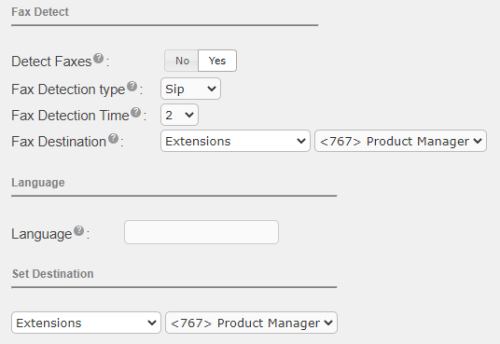
The result should be that the received call will be answered, voice path established, the system will wait for 2 seconds attempting to detect a fax tone, and then the call will be routed further. If call forward is the result of the routing, the already-answered call should have voice path maintained through to the forwarding path. Note that all incoming calls arrive via an inbound route, even those that are not for a specific users so you may need to configure the fax detection on any inbound route that is could result in being forwarded and not actually answered on the UCX.
Video Tutorial
Self Assessment Quiz
- What happens if you leave the DID Number field blank?
- Which field in your Inbound Route do you need to configure to enable the Call Screening feature?