

Setting up UCx for Call Center Agents
1. Overview
There are two types of agents that you can configure in a queue:
- Static Agents are extensions that are assumed to always be in the queue. Static agents do not need to ‘log in’ to the queue, and cannot ‘log out’ of the queue.
- Dynamic Members are extensions that must manually 'log in' and 'log out' of the queue.
You can include an extension on a remote system, or an external number (Outbound routing must contain a valid route for external numbers).
2. Configuration
Agents are configured in the Queues page by listing the extension number in the Static Agents box or the Dynamic Members box.
Penalties can be defined for each member in a queue by adding a "," followed by the penalty number. For example:
200,1
201,2
202,3
203,2
Restrict Dynamic Agents if set to Yes, will restrict queue member logins to only those listed in the Dynamic Members list, those not listed will be DENIED access to the queue.
Agent Restrictions controls the behavior of the call path:
-
Call as Dialed – queue will call extension just as if the queue were another user. Any FM or CF states active on the extension will result in the queue call following these call paths.
-
No Follow-Me or Call Forward – all agents that are extensions on the system will be limited to ringing their extensions only. Follow-Me and Call Forward settings will be ignored. Any other type of agents will be called as dialed.
-
Extensions Only – queue will dial extensions as described for “No Follow-Me or Call Forward”. Any other number entered for an agent that is NOT a valid extension will be ignored. No validation is provided when entering the number for static agents or when logging in as a dynamic agent, the call will simply be blocked when the queue tries to call it.

The following sections describe how to set up the two types of agents:
3. Dynamic Agents
If the queue has Dynamic Agent Members configured, agents with these extensions have to login to the queue in order to be recognized as available to receiving incoming calls. The information on this page provides instructions on how to set up agents with the following capabilities:
- agents can "add" and "remove" themselves as a member of the queue
- agents can toggle between "ready" and "not ready" states
Because dynamic agents must formally login and logout of queues, their state can be more easily tracked in Call Center reporting features, leading to more accurate results in those reports. If you plan to use Call Center reporting capabilities, this is the preferred configuration for agents.
3.1. Queues Feature Codes
To view or modify the feature codes associated with queues, see Feature Codes in the UCx Administration Guide.
The default feature codes to use are:
- *45 to toggle queue membership
- *46 to toggle ready state

3.2. SIP phone agents
Agents with SIP phones can "login" or "logout" of the queue by dialing *45xxx where xxx is the queue number.
In our example, the steps to login would be:
- Dial *45600 from the agent's phone (e.g. agent's extension is 509)
- System will announce "509 Added"
The steps to logout would be:
- Dial *45600 from the agent's phone (e.g. agent's extension is 509)
- System will announce "509 Removed"
Agents with SIP phones can also toggle between "not ready" and "ready" states by dialing *46xxx where xxx is the queue number.
The system will play an announcement "Pause Activated" or "Pause Deactivated" to confirm the agent's state.
3.3. Nortel phone agents
If the agent has a Nortel phone, the Nortel feature code F901 can be used to toggle agent login and logout, there is no need to specify the queue number. This feature adds the extension to all queues in which the extension is configured as a dynamic member. The second invocation of F901 removes the extension from all queues in which the extension is a member.
This feature is very useful for agents participating in multiple queues. If the agent wants to login or logout of a specific queue, *45xxx (where xxx is the queue number) can still be used.
While logged in to a queue via the feature code F901, the corresponding feature code F902 will toggle the agent between "not ready" and "ready" state.
To configure the feature codes F901 and F902 on a Nortel phone, perform the following steps:
- Open the UCx Web-based Configuration Utility
- From the PBX tab, select PBX Configuration
- From the left side column, select Extensions (Nortel)
- From the right side column, select the desired extension or "Add Nortel Device"
-
Go to Progammable Keys section, from the pull-down list:
- select Agent Login Toggle for feature F901
- select Agent Not Available for feature F902
-
Press the Submit Changes button

4. Static Agents
Static agents do not need to 'login' or 'logout' of a queue, they are always 'logged-in' to the queue when the extension is active or registered. However, since they are not required to login and logout, Call Center Reporting capabilities for static agents cannot be accurate when compared to data from dynamic agents. Therefore, E-MetroTel's recommendation is to configure dynamic agents when using Call Center Reporting tools to monitor queue and agent behaviors for Call Center improvements and agent performance analysis.
4.1. Add Static agent to Queue
The extension needs to be added as a static member of the queue. For more information on queues refer to Queues.
-
Add the Hotdesk extensions as static members

- Press the Submit Changes button
5. Hotdesking
Hotdesking is a mechanism that can be used to allow sharing of phones across shifts in a call center while maintaining each agent's unique identity and queue profile. At the start of an agent shift, they can sit down at any unoccupied agent desk, hotdesk to their unique extension, and then login to their queues and start receiving their calls. Reports of their call flows will be tied to the extension that they hotdesked to. Note that they if they are configured as Dynamic members of queues, they will need to login and logout of their queue prior to being sent calls. However, this is the preferred configuration for many call centers as this creates accurate times on agent availability compared to static agent configurations. (Hotdesking merely associates a phone with an extension so that calls can be completed to it.)
5.1. Enable Hotdesking
To configure Hotdesking it must first be enabled in the Nortel Setting, to do this perform the following steps:
- Open the UCx Web-based Configuration Utility
- From the PBX tab, select PBX Configuration
- From the left side column, select Nortel Settings
- Enable Hotdesking
- Enable Hotdesking Message if desired, gives a visual indication that a phone is currently hotdesking
-
Press the Submit Changes button

5.2. Configure Hotdesk Extension
The Hotdesk extension must then be configured for Hotdesking with a MAC address of 0, to do this perform the following steps:
- Open the UCx Web-based Configuration Utility
- From the PBX tab, select PBX Configuration
- Either add a new extension or select one to be modified
-
For the MAC Address enter 0

- Select Edit Nortel Properties from the list of actions listed
- Allow Hotdesking for this extension (or Default will inherit configuration from Nortel Settings page)
-
Enter a Hotdesking Password for this extension

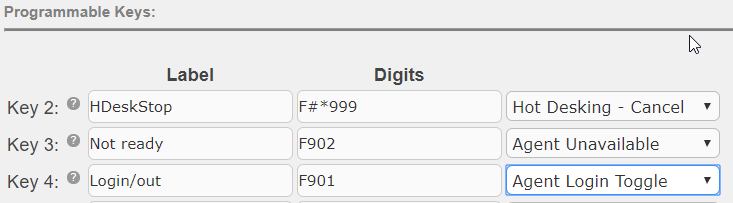
- Configure a Hot Desking - Cancel key
- Configure an Agent Unavailable key
-
Configure an Agent Login Toggle key

- Press the Submit Changes button
5.3. Agent Login
With the phone configured to connect to the UCx Server and the MAC address set to 0, the phone will be unregistered with the Hotdesk login key displayed.
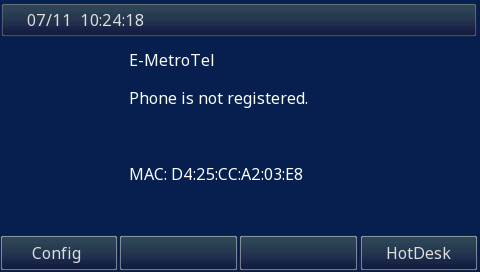
To login:
- Press the Hotdesk (HDesk) softkey
- Enter the Hotdesk extension
- Enter the Hotdesk password for the extension. The set will register and assume the configuration settings of the logged in extension.
- If the agent is a dynamic member, they will press the Agent Login Toggle button and be logged in to all their assigned queues at once. If the agent is a static member of queues, the agent will automatically be shown as available in the queue(s).
5.4. Agent Logout
To logout, simply press the Agent Login Toggle button to log out of the queue and then the HotDesk Cancel (HDeskStop) key or the Unreg key or invoke the HotDesk Cancel Feature #*999.

5.5. Agent Not Ready
If the agent wants to be temporarily unavailable without having to log out of the phone, the Agent Not Ready key (or Feature F902 or dial *46 ) can be used to toggle between 'Ready' and 'Not Ready' states.
6. Remotely Changing Agent State
There may be instances when agents forget to 'logout' when they leave and the supervisor wants the ability to 'logout' or 'not ready' agents remotely. To achieve this capability, the supervisor needs to have the following:
- access to a phone connected to the UCx (this can be a remote phone) with Hotdesking allowed
- know the hotdesking password of the agent's extension
Configuration
- Allow Hotdesking for the supervisor's phone
- Configure Hotdesking Password for the agents' extensions
Remotely changing state for Dynamic Agents
To remotely change the state of a dynamic agent, perform the following steps:
- From a phone connected to the UCx, press the Hotdesk (HDesk) softkey or invoke the Hotdesk Feature (*999)
- Enter the extension of the agent
- Enter the Hotdesk password for the extension
- Invoke feature F901 or dial *45 to toggle the agent login/logout state or
- Invoke feature F902 or dial *46 to toggle the agent ready/not ready state
- Press the Hotdesk (HDesk) softkey to logout OR invoke the Hotdesk Cancel Feature (#*999)
Remotely changing state for Static Agents
To remotely change the state of a static agent, perform the following steps:
- From a phone connected to the UCx, press the Hotdesk (HDesk) softkey or invoke the Hotdesk Feature (*999)
- Enter the extension of the agent
- Enter the Hotdesk password for the extension
- Invoke feature F902 or dial *46 to toggle the agent ready/not ready state
- Press the Hotdesk (HDesk) softkey to logout OR invoke the Hotdesk Cancel Feature (#*999)