

Galaxy Expand/Express - PRI-1 General Configuration Process
Configuring the PRI-1 in a Galaxy Expand or Galaxy Express Chassis
1. Install the PRI-1 card in a Galaxy Expand or Galaxy Express slot
PRI-1 cards may be installed in any of the 11 slots within a Galaxy Expand chassis or either of the two Galaxy Express slots. A single chassis can support multiple PRI-1 cards.
- Disconnect the Power Supplies on the Galaxy Expand or the single Power Supply cord on the Galaxy Express from the power source.
- Insert the PRI-1 Card in one of the available slots.
- Re-connect the power supply cord(s) to the power source.
2. Connect to the Galaxy Expand/Express - PRI-1 card
2.1 Network Interface Options
The PRI-card has two data network interfaces; one on the front of the PRI-1 card and one via the backplane connector.
- If using the Ethernet connection on the front of the PRI-1 card, plug-in an RJ-45 connector between the PRI-1 Card and the network.
- If using the on-board ethernet connector on the rear of the PRI-1 card on the Galaxy Expand, make sure that there is an active DHCP Server configured either on a Galaxy Server card or accessible via the Switch Fabric card front plate ethernet interface.
- If using the on-board ethernet connector on the rear of the PRI-1 card on the Galaxy Express, make sure that there is an active DHCP Server accessible via the Eth2 port on the back of the Galaxy Express.
2.2 IP Addressing
2.2.1 Front Panel Ethernet Interface
The default address for the front panel ethernet interface (eth0) is configured as 192.168.1.175 with a subnet mask of 255.255.255.0 and a gateway address of 192.168.1.1. Typically the UCX connection will be configured via the backplane Ethernet interface (see below).
2.2.2 Backplane Ethernet Interface
The PRI-1 Card defaults to using DHCP procedures to obtain an IP address on the backplane network interface. Typically, this interface is connected using DHCP using the integrated DHCP server of the UCX server card in the Galaxy Expand or Express chassis during initial configuration. This should be converted to a static IP address once the card is online and connected.
If the default address assignment of either of these interfaces does not align with the needs of your network, you can:
- Manually change the setting of of either ethernet connection to another static IP address if you want to use the front panel ethernet connector by configuring a PC to temporarily use an address in the same subnet as the the default interface you are attempting to connect to..
- Change the setting of eth0 to DHCP if you want to use the front panel ethernet connector
- Use the DHCP IP address assigned to the backplane interface
IP Address configuration for both of these interfaces can be modified in the Network / Network Settings page.
2.3 Connect to the PRI-1 card via a browser
Point your browser to the IP address as determined in the preceding step. The default login credentials are username of admin and password of emetr0tel.
3.0 Configure the PRI-1 Card to operate with the UCX Server
3.1 Create a SIP connection between the PRI-1 card and the UCX software
The communication between the PRI-1 card and the UCX software takes place via SIP protocol. Both the PRI-1 card and the UCX Server software need to be configured.
3.1.1 Configure the UCX SIP Settings
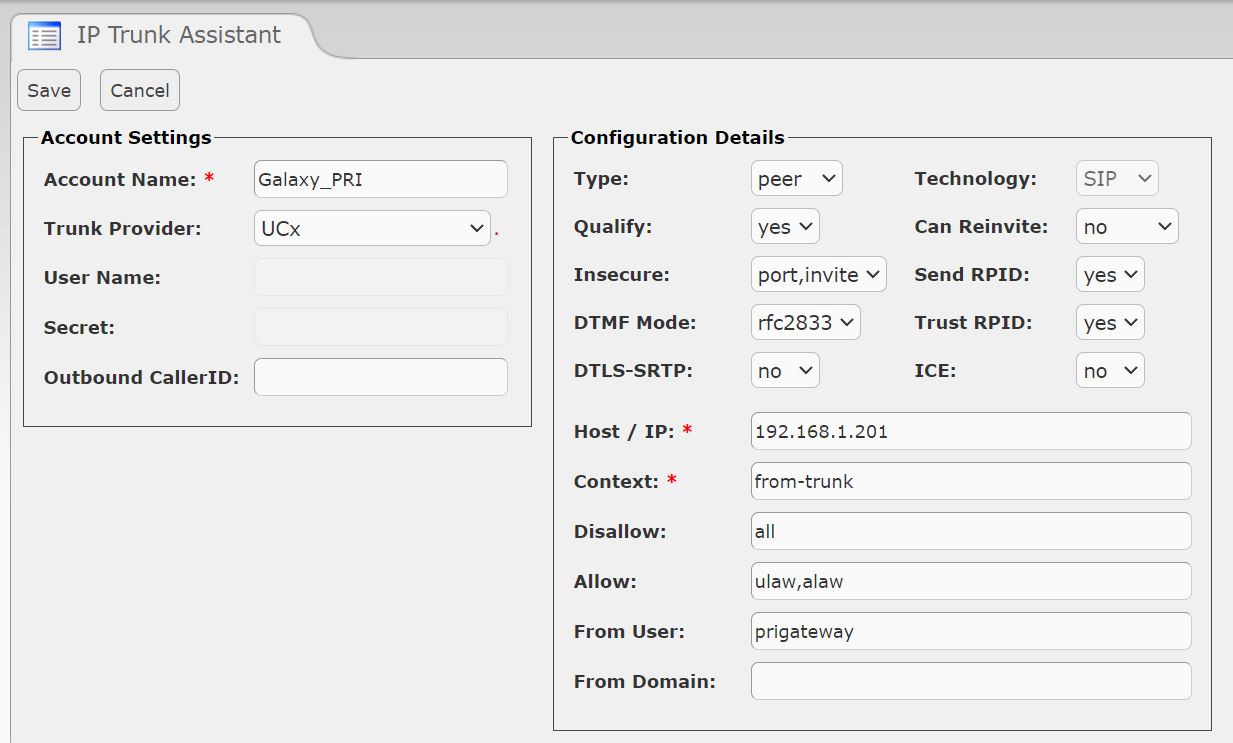
Open the UCX Web-based Configuration Utility, and navigate to the PBX / IP Trunk Assistant page to add a new SIP trunk to communicate with the PRI-1 card. Create a new SIP trunk with the following settings:
-
In the Account Settings section, enter the following:
- In the Account Name field, enter a value, for example "Galaxy_PRI"
- In the Trunk Provider field, make sure UCX is selected (default value)
-
In the Configuration Details section, enter the following:
- Leave the drop down selection boxes at the default values.
- In the Host / IP field, enter the IP Address of the PRI-1 Card
- In the From User field, enter the same name you will configure on the PRI-1 Card From User field (step 3a in section 4.1.2 below): "prigateway"
-
Click Save

3.1.2 Configure the PRI-1 Card SIP settings
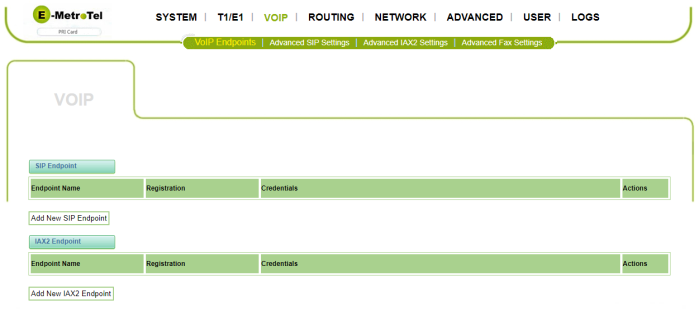
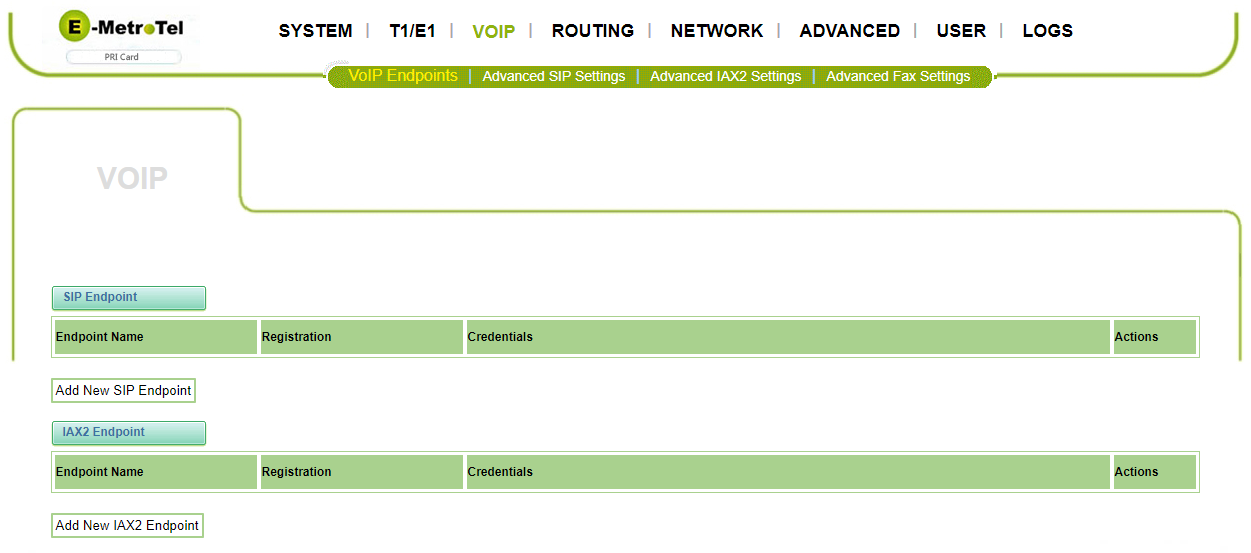
The PRI-1 Card SIP settings are configured in the VOIP / VOIP Endpoints page. While either SIP or IAX2 trunks can be configured the steps to configure SIP Trunks are as follows:
-
On the VOIP / VOIP Endpoints page, click Add New SIP Endpoint
-
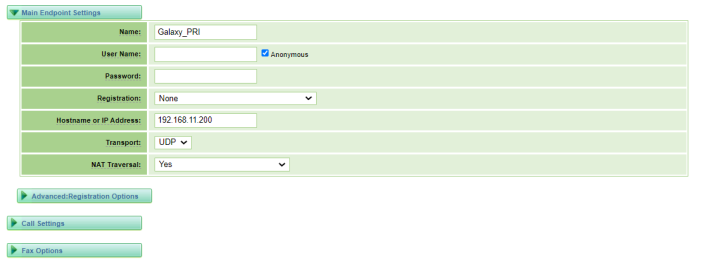
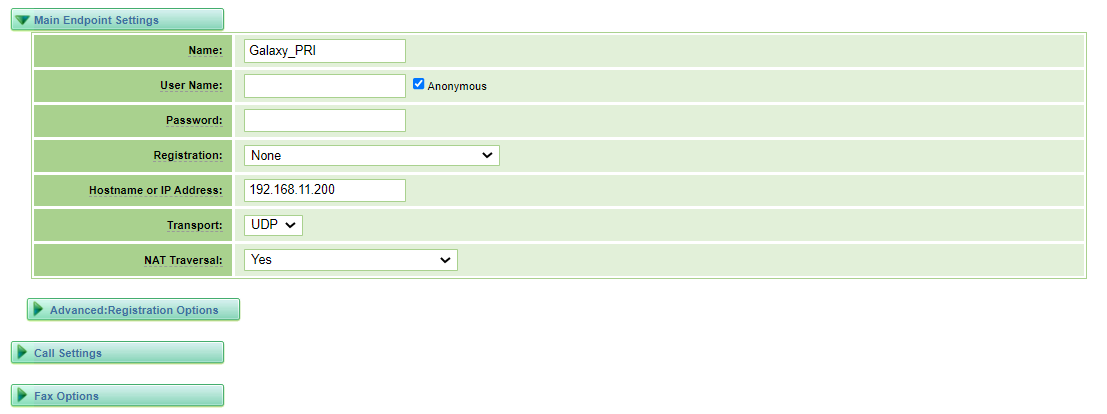
In the Main Endpoint Settings section, enter the following:
- Name: enter an arbitrary reference name for this connection (eg. Galaxy_PRI_PRI)
- User Name: You can leave this field blank.
- Password: You can leave this field blank.
- Registration: Choose None
- Hostname of IP Address: Enter the IP Address of the UCX Server, for example = 192.168.11.200
- Transport Type: Choose UDP
-
NAT Traversal: Choose No
-
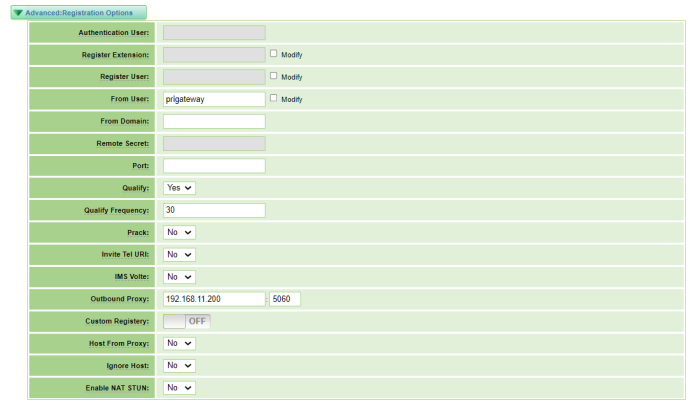
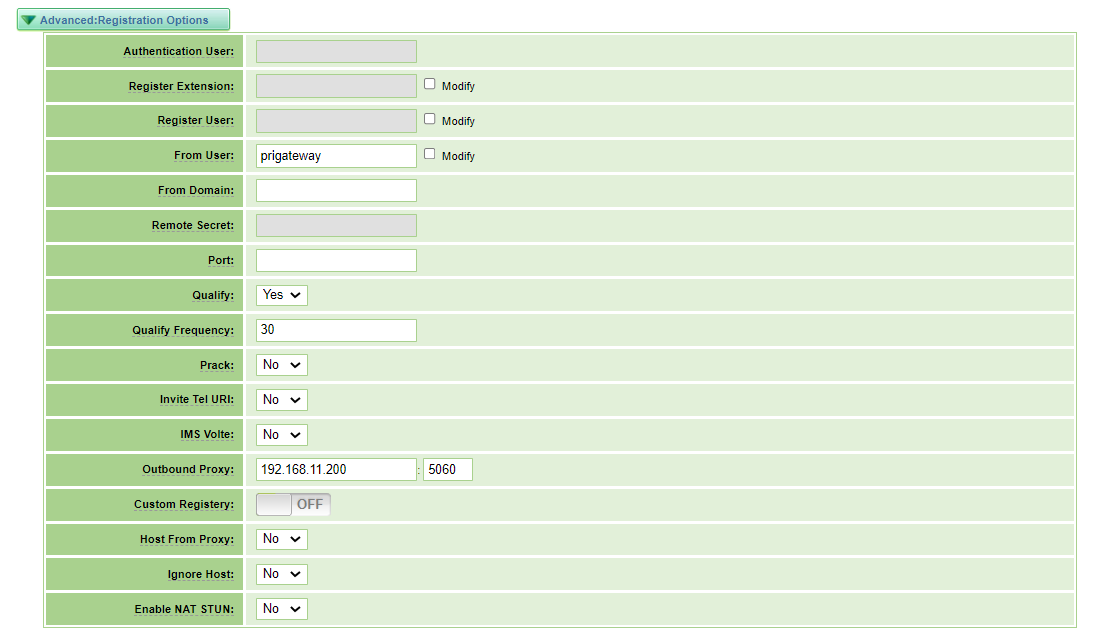
In the Advanced: Registration Options section, enter the following:
- In the From User field, click the Modify checkbox then enter the value used in configuring the SIP Trunk on the UCX (step 2c in Section 3.1.1, above) for example "prigateway"
- In the Qualify field, select Yes
- In the Qualify Frequency field, enter 30
- In the Prack field, select No
- In the IMS Volte field, select No
- In the Outbound Proxy field, enter the IP Address of the UCX, and the Port to 5060 (if default value on UCX has not been changed).
- In the Custom Registry field, select Off
- In the Host from Proxy field, select No
-
In the Ignore Host field, select No
-
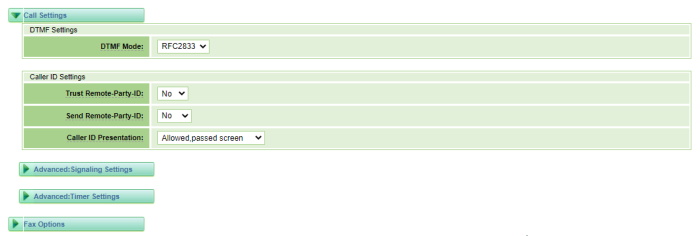
In the Call Settings section, ensure that the settings are as follows:
- DTMF Mode: ensure RFC2833 is selected
- Trust Remote-Party-ID: Select Yes
- Send Remote-Party-ID: Select Yes
-
Caller ID Presentation: Select Allowed not screened
-
The default values can be used in the Advanced Signaling Settings
- Progress Inband: Yes
- Append user=phone to URI: No
- Add Q.850 Reason Headers: No
- Honor SDP Version: Yes
- DirectMedia: Yes
- Allow Transfers: Yes
- Allow Promiscuous Redirects: No
- Max Forwards: 70
-
Send Trying on Register: No

-
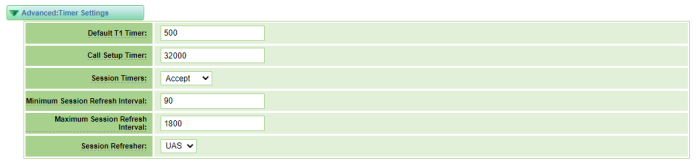
The default values can be used in the Advanced Timer Settings
- Default T1 Timer: 500
- Call Setup Timer: 32000
- Session Timers: Accept
- Minimum Session Refresh Interval: 90
- Maximum Session Refresh Interval: 1800
-
Session Refresher: UAS
-
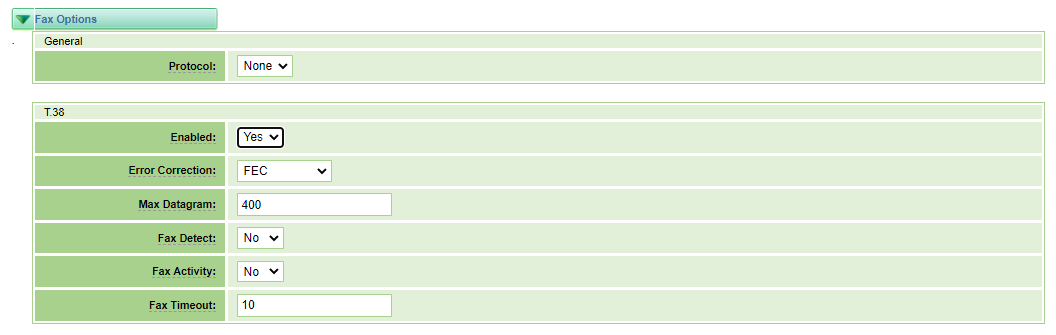
The default values can be used in the Fax Options sections if you are not using fax. If you are configuring fax ensure that:

- Protocol is set to T.38
- T.38 Enabled is set to Yes.
- Click Save
-
You will be notified that the settings have been changed and that calls may be terminated when you apply the changes. You may click the Apply Now if you are ready, or click the X to delay the application.


3.1.3 Making changes to the settings:
- To change any of the values, click the Pencil icon
-
To delete the entry, click the red X icon


3.2 Configure the T1/E1/PRI on the PRI-1 card
3.2.1 Configure the T1/E1 General settings
-
Navigate to T1/E1 / General in the PRI-1 Card configuration.

- In the General section, For anywhere in North American, including Canada, choose United States for the the Locale, T1 for the Interface Type, and Ulaw for the Span Default Law.
- In the Advance Interface Type, turn Echo Cancellation to On with an EC Taps setting of 128 (Change from the default of 1024).
-
Under Port Details, choose a value for:
- Timing Source: If this is to be the master, set value to 0; If the far end is to be the master clock (the PRI-1 Card will derive clock from the far-end) set this value to 1. Typically the PRI-1 Card will be connected to the PSTN so this value should be set to 1.
- Coordinate with your service provider to make sure the values for the Framing, Coding, Line Build-out, and Switch Type are correctly set. Typically, if this is a Service-Provider connection, the Signaling must be set as PRI (CPE side).
- Click Save.

3.2.2 Configure the T1/E1 PRI settings
-
Navigate to T1/E1 / PRI in the PRI-1 Card configuration.
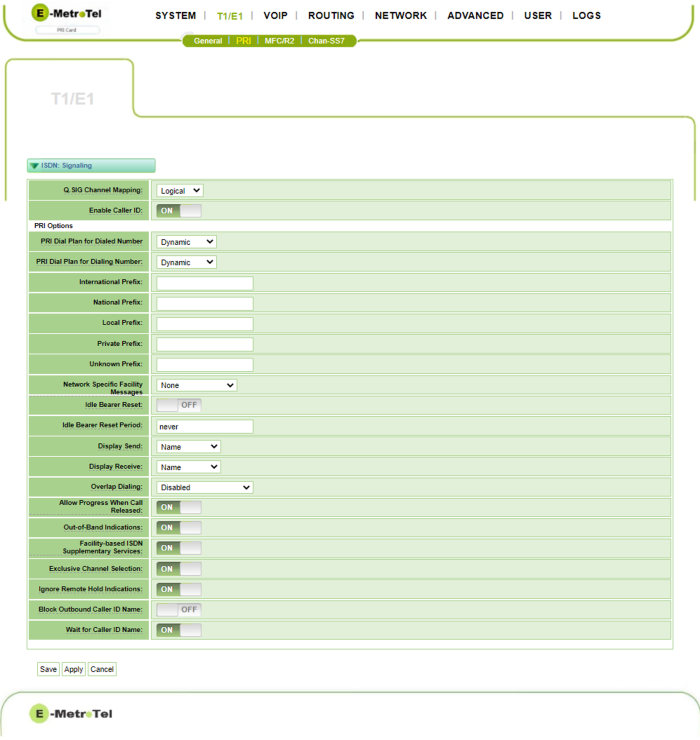
- Under PRI Options, ensure that the PRI Dial Plan for Dialed Number and PRI Dial Plan for Dialing Number are set based on the values expected by your PRI carrier.
- Configure any other settings consitent with the requirements of your PRI carrier.Click Save

3.3 Configure the Call Routing Rules
Call Routing Rules for both directions (UCX to PRI interface and PRI Interface to the UCX) must be set in the Routing / Call Routing Rules page.
3.3.1 New Call Routing Rules
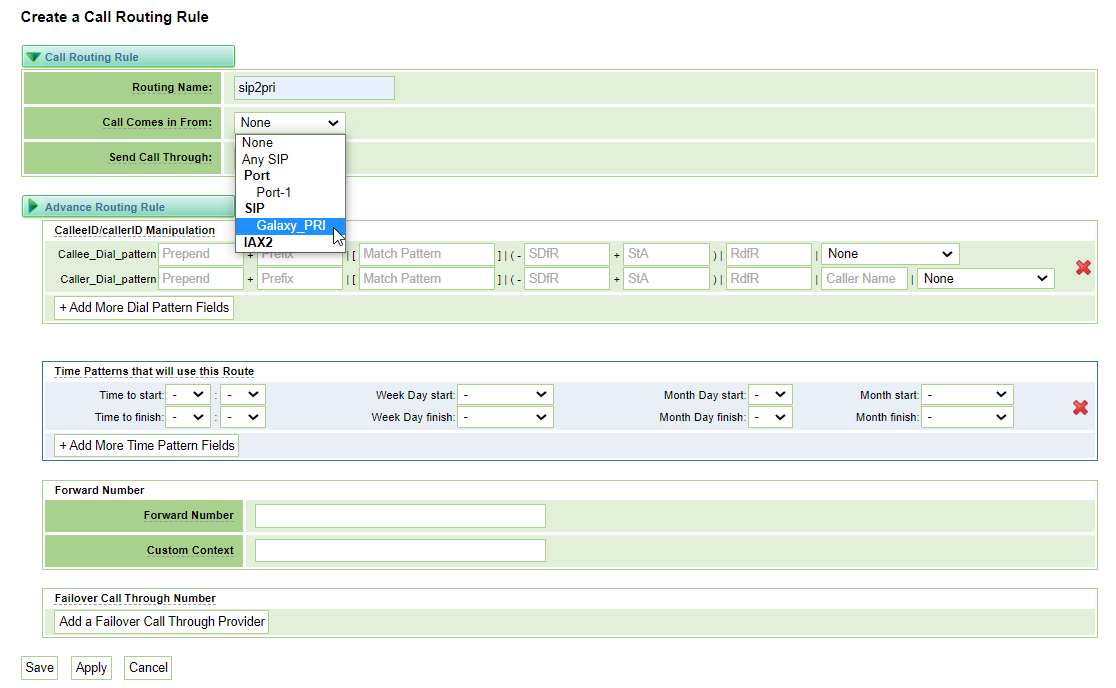
- Click on New Call Routing Rule
- Enter a Routing Name (eg. sip2pri)
- In the Call Comes in From dropdown, select the SIP interface name you created above in Section 3.1.2 (eg. Galaxy_PRI)
-
In the Send Call Through dropdown, select Port-1 of the Port list

- All other field can remain blank
- Click Save
- Click on New Call Routing Rule again to create a second rule
- Enter a Routing Name (eg. pri2sip)
- In the Call Comes in From dropdown, select Port-1 of the Port list
-
In the Send Call Through dropdown, select the SIP interface name you created above in Section 3.1.2 (eg.Galaxy_PRI)
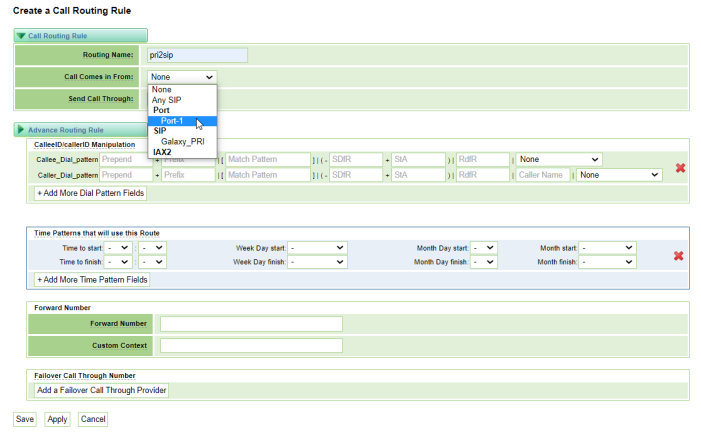
- All other fields can remain blank
- Click Save

3.3.2 Making Changes to the settings:
- To change any of the values, click the Pencil icon
-
To delete the entry, click the red X icon

