

You are here
Documentation
- InfinityOne Omnichannel (Beta)
- InfinityOne
- Infinity Video Server (Beta)
- InfinityOne Work at Home
- Galaxy Mini
- Galaxy Mini - Table of Contents
- Galaxy Mini - Overview
- Galaxy Mini - Server Hardware
- Galaxy Mini - Supported Phones and Devices
- Galaxy Mini - Front and Rear Panel Interfaces
- Galaxy Mini - FXO/FXS Module Installation
- Galaxy Mini - Connecting the Server to the Network
- Galaxy Mini - Activating and Licensing
- Galaxy Expand
- Galaxy Expand - Table of Contents
- Galaxy Expand - Platform and Hardware Overview
- Galaxy Expand - Module Installation
- Galaxy Expand - Initial Configuration
- Galaxy Expand - Reference Architecture
- Galaxy Expand - Common Configuration
- Galaxy Expand - Standalone UCX Server Configuration
- Galaxy Expand - High Availability UCX Configuration
- Galaxy Expand - Local Gateway (Expansion Chassis) Configuration
- Galaxy Expand - Remote Gateway Configuration
- Galaxy Expand - Survivable Remote Gateway Configuration
- Galaxy Express
- Galaxy Modular Hardware
- Galaxy Analog Cards
- Getting Started with Galaxy Analog Cards
- Galaxy Analog Gateways - IAD Firmware
- Galaxy Analog Cards - Original Firmware
- Galaxy PRI-1 Card
- Galaxy Analog Cards
- Servers and Gateways
- Introduction
- Planning
- Quick Start
- UCX Virtual Machine
- UCX Server
- UCX Web-based Configuration Utility
- System
- Fax
- PBX
- Reports
- Accessories
- My Extension
- Security
- Support
- Survivable Remote Gateway (SRG)
- High Availability (HARC)
- UCX Digital Station Module (DSM16)
- UCX M1/CS1000 Media Gateway
- Digital Gateway
- External Gateways and Devices
- SIP PSTN Trunks
- SIP Trunks
- How-To Guides
- UCX Applications
- UCX Features
- Answer DN Behavior
- Background Music
- Busy Lamp Field (BLF)
- Global BLF key label change
- Parking Lot Monitoring Solutions
- Call Transfer and Recall
- Call Monitoring
- Call Recording Options
- Dial System Fax
- Dictation Service
- Distinctive ring tones
- Fax to Email
- Group Pickup
- Hotline UCX Configuration
- Hotdesking
- Language prompts
- Long Tones
- Ring Again (Call back)
- Shared Call Appearances
- Set Based Configuration
- UCX MADN Emulation Solutions
- Unified Messaging for M1/CS1000 Users
- User Portal
- Voicemail and VmX Locater
- Voicemail Escalation
- Voicemail Message Indicator
- ZapBarge
- Telephones
- Installation Guides
- Product Specifications
- General Information
- Product Bulletins
- Product Notices
- InfinityOne Package Update Required
- UCX 6.0 End-of-Support
- UCX 7.0 and InfinityOne 4.0 General Availability
- VPN Security Update Required
- Email Relay Using Gmail Account Fails Due to Bad Credentials
- InfinityOne Release 2.x End-of-Life
- InfinityOne Android App General Availabililty
- E-MetroTel not affected by Log4j vulnerability
- Web-based GUI Security Enhancements
- User Portal Security Update
- Simplified UCX Configuration for Remote InfinityOne Softphones
- InfinityOne Release 3.0 Server General Availability
- Availability of Connection Sharing
- Availability of Automated Cleanup
- Availability of IP Block List Feature
- InfinityOne Release 2.0 Availability
- Digital Station Module (DSM16) Availability
- UCX Software Updates
- Quotations and Ordering
- Nortel Legacy
- Support and Troubleshooting
- Partner Onboarding
- E-MetroTel Business Practices
- Recurring Services Payment Policy
- Product Licensing
- Extension Provisioning Services
- Subscription Services
- E-MetroTel SIP Trunk E911 Registration
- Reseller Responsibilities
- Software Subscription and Warranty Transfer Request
- Return Material Authorization (RMA) Policy
- Acceptable Use Policy
- E-MetroTel Beta Trial Policy
- E-MetroTel Training Expectations
- 9-1-1 Services Agreement (Canada)
- References
Backup
The UCX Backup procedures do not include InfinityOne related data (configuration or chat history, etc.) other than the phone settings for extensions assigned to InfinityOne users. This must be done through the InfinityOne administration interface. Refer to InfinityOne - Backup and Restore and ensure that you perform backups of InfinityOne on a regular basis.
System specific information like Network Parameters, Admin password, Time Settings, Security certificates and License are not backed up nor restored. Other configuration information that are not backed up and restored include: Remote SMTP and Fax Clients.
The following checks are performed prior to allowing the backup to proceed:
- Backups are disallowed when free space in the backup directory is less than 100 MB.
- Backups are disallowed when there is insufficient free space in the backup directory to create the required temporary files and the backup file.
- Backups to USB drive formatted to FAT32 are disallowed if the generated backup file size is over 2 GB.
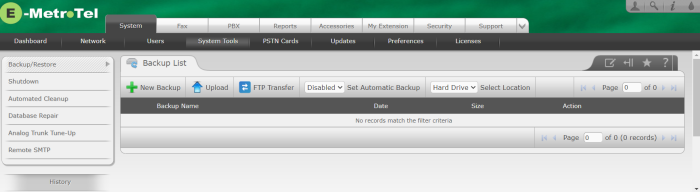
To create a backup of your UCX system configuration data, perform the following steps:
- Open the UCX Web-based Configuration Utility
- From the System tab, select System Tools
- From the left hand menu select Backup/Restore
- The Backup List page shows all the completed backups (if any)
-
Press the New Backup button to proceed to the page that shows the backup options
-
Select the options that you want included in the backup. You can select items from the following categories:
- Asterisk
- Databases
- Addons
- GUI
- Endpoint
- Fax
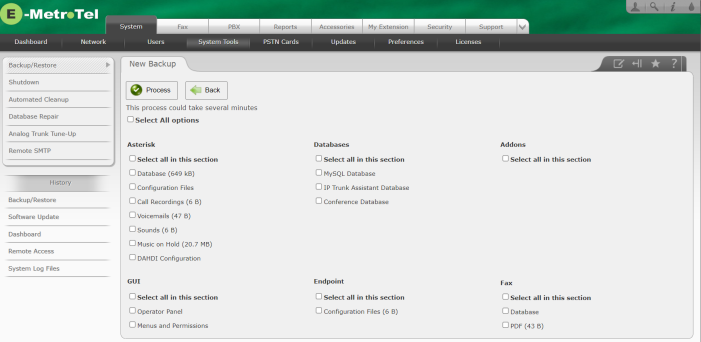
Before starting the backup operation, please review the amount of data listed for the Call Recordings and Voicemails options. If the size of call recordings and/or voicemails is in gigabytes, the backup operation is likely to take a long period of time (for large data sets even several hours). If the data size is very large, either exclude these options from the backup or make sure you can wait for the completion of the lengthy operation.
Call Recordings and Voicemails options are automatically disabled if it uses more than 1.8 GB of space in the backup file.
- Press the Process button to start the backup operation
- Depending on the selected options, the backup operation can take certain amount of time. Wait for the backup operation to complete
-
Once the backup is completed, press the Back button to return to the Backup List page
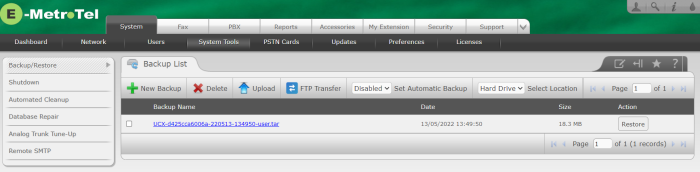
- The completed backup will be listed with the corresponding date and size
-
The backup can be downloaded to your PC by clicking on the Backup Name link
If the backup file size exceeds 500 MB, the download link is disabled. Backup files exceeding 500 MB can be downloaded using a SCP client (e.g. WinSCP). Backup files are located in the /var/www/backup directory on the UCX.
- To delete a backup file, select the checkbox beside the filename and press the Delete button.


Note: Backups can also be invoked from the UCX Command Line Interface (CLI) in both UCX Release 6.0 and 7.0. This requires logging into the UCX with an SSH connection via an application such as PuTTy and logging in with the Admin account credentials. At the command line prompt, type ucxcli_backup. The backup will be performed and appear in the Web-based Configuration Utility as if it was an automated back up (i.e. no Voicemail or Call Recordings). The backup process will provide real-time feedback of the progress until it is complete and the command prompt will be displayed.
Video Tutorial
Self Assessment Quiz
- Can backups be scheduled?
- Can FTP transfer of backup files be scheduled?
- Can you perform a backup to a USB drive instead of the Hard drive?
- If system does not allow you to proceed with a backup, what are the possible reasons?